Saturday 11 April 2015

A quick black top

I've realised that I don't want to make every make a hard, complex make and there have been a few of these lately. During one of my recent pattern purchases I selected some Kwik Sew patterns. I've not used these patterns before. It was underwear patterns that caught my interest at first, but I also picked up Kwik Sew 3658, a dress/top pattern. Pattern notes: "Fitted pull-over dress and top with v-neckline and draped collar". It was the draped collar that caught my eye. And I thought it would be a good work staple.


I also picked up enough mid-weight black poly ITY to make it up. The pattern and fabric languished in my stash for a little while. But after my Oslo I was keen to follow up with another easy make. I've not had much experience with ITY. I was unsure what stitch would be best so I went to my sewing manual. My machine has 30-something stitches, half of which are stretch stitches. With my previous knits experiences, I have used the stretch straight stitch as well as a narrow zigzag, both with great success. But I thought I would try something different. In addition, the pattern has narrow seam allowances, so I tried an elastic overlock stitch to protect the seam from any fraying.

This pattern has four pieces: a front, back and two sleeves. I had it cut out and ready to sew in less than an hour. I had trouble visualising the collar; the front is self faced and the seam between the front and back is off the shoulder towards the back. But I faithfully followed the instructions and it all worked out.


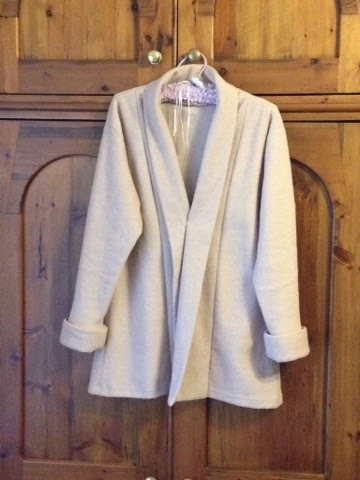
But I am disappointed with how the seams turned out. Rather than a clean straight seam, the overlock seam has created a ripple effect on the seams. The most obvious is the centre front seam. You can see it pulling in the photo - although it doesn't look as bad when worn. I was discussing this issue with a sewist colleague. I mentioned "error". She scoffed and said "purposeful design." After I stopped laughing 😉 I realised that she's right. Just because the seam isn't smooth and how I wanted it to look at first, doesn't mean it's not "right." And the ripple seams does change a pretty bland top into something a little bit different. Fir is pretty good. ITY is pretty forgiving. I will make it up again and will add about 1" to the length. 

My Oslo

I have subscribed to Seamwork by Colette Patterns. Sarai's philosophy of interspersing complex makes with simple ones resonated with me. My pattern stash and planning has focussed on more technical, detailed clothes. So Seamwork came along at the right time. Recent makes include two fitted dresses and a semi-fitted and collared shirt so it's time for a simple make.

It's also starting getting cold! March's MAGAM marked the transition to Autumn (and Spring in the other half of the world). So I've decided to make an Oslo. Have you seen this pattern? It says "snuggle" and "comfortable" and "warm".

I've already introduced my new favourite LFS (hello Catwalk Fabrics!) and during my last visit I found some wool polyester knit in a pale cream/pink colour. It was the colour that caught my eye and its feel that got it off the rack and over to the cutting table 😊. This fabric is a one-way about 20% stretch.

Before I cut into my fabric, I researched how I should handle it. Here's what I did:
  • I prefer shears to a rotary cutter but in order to minimise distortion I traced each piece onto the fabric before I cut out
  • I used pattern weights (aka cans from the pantry) instead of pins
  • I did consider cutting out on one layer of fabric, but this knit is fairly stable and the wool loosely locked together with very little movement, so I cut out the pattern with the fabric doubled
  • I used a jersey needle, with a fuzzy poly stretch thread in the bobbin (hand wound - a zen moment) and a triple knit stitch on my sewing machine
  • I always back stitched at the beginning and end of each seam - learned this one the hard way
I cut out a straight medium. The fit is very forgiving so I didn't make any adjustments.

Sarai's instructions are excellent. They were easy to follow with plenty of detail. I made up according to the instructions with the exception of the cuff hems which I finished by hand with a slip stitch. I'm into hand finishing seams at the moment. I didn't add buttons. I like the more casual no buttons look. 

I'm really happy with the result. Arm length is perfect although some people might think they are a little long. The shawl collar sits nicely.

I've been waiting for weeks for a drop in temperature so I can wear my Oslo out. Last week I had my first opportunity to wear it and received some lovely compliments, but it's taken me another week to remember to take a photo.


Thursday 2 April 2015

Humming Bird Shirt

I've been inspired by some fave bloggers working through shirt construction (MPB and Sewaholic - excellent blogs!). I am short of nice shirts and wanted something that would look equally nice dressed up for work or down for casual. I have been looking for a shirt pattern with shape but not too fitted. Also a collar. I took ages to find one that fitted the bill and when I did, of course my choice was an OOP pattern - New Look 6407. But luckily I found it in Etsy. I like the variations available in the single pattern: collar - no collar, short sleeves - long sleeves, cuffs, lace. Love it!


I had a recent stash acquisition languishing in my pile. It's black poplin with bright coloured humming birds flirting across it. Not my normal fabric style but I like it. It wasn't expensive so I decided that it would be good for a wearable muslin.


I made up a standard 14, with short sleeves and a collar. The final fit isn't too bad. Good dart positions. A little large all over and a bit larger again over the hips (usual for me). The main issue is the plunging neckline. It sits waaaaaay lower than I comfortable with - especially at work 😉.

Here's a bad mobile shot from work.